
Getting Started with the Vehicle Specification Language
In this chapter we will introduce the basic features of the Vehicle specification language via the famous ACAS Xu verification challenge, first introduced by Guy Katz et al. Katz, G., Barrett, C., Dill, D. L., Julian, K., & Kochenderfer, M. J. (2017). Reluplex: An efficient SMT solver for verifying deep neural networks. International Conference on Computer Aided Verification, 97–117. (arXiv).
ACAS Xu
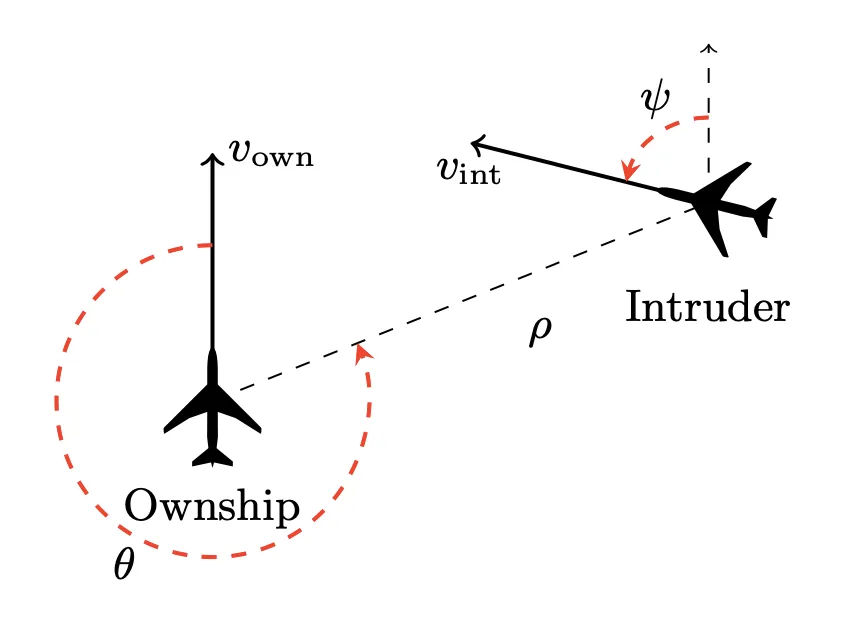
ACAS Xu stands for Airborne Collision Avoidance System for unmanned aircraft. The objective of the system is to analyse the aircraft’s position and distance relative to other aircraft and give collision avoidance instructions.
In particular, the following measurements are of importance:
: feet measuring the distance to intruder, : radians measuring angle of intrusion, : feet per second - the speed of both aircrafts, : seconds - time until loss of vertical separation, : previous advisory
as the following picture illustrates:
Based on these inputs, the system should produce one of the following instructions:
- clear-of-conflict (CoC),
- weak left,
- weak right,
- strong left,
- strong right.
In practice, the domains of
Therefore each of the 45 ACASXu neural networks have the mathematical type
The original paper by Guy Katz lists ten properties, but for the sake of the illustration we will just consider the third property: If the intruder is directly ahead and is moving towards the ownship, the score for COC will not be minimal.
Basic Building Blocks in Vehicle
Types
Unlike many Neural Network verifier input formats, Vehicle is a typed language, and it is common for each specification file starts with declaring the types. For ACAS Xu, these are the types of the real number tensors that the network will be taking as inputs and giving as outputs:
type Input = Tensor Real [5]
type Output = Tensor Real [5]
The Tensor type represents a mathematical tensor, or in programming terms can be thought of as a multi-dimensional array. One potentially unusual aspect in Vehicle is that the shape of the tensor (i.e its dimensions) must be known statically at compile time. This allows Vehicle to check for the presence of out-of-bounds errors at compile time rather than run time.
The most general Tensor type is therefore written as Tensor A d, which represents the type of tensors with shape d with elements of type A. The argument d is a list of numbers, where each number represents a dimension, e.g., if d is [2, 3] then the tensor is a 2-by-3 matrix.. In this case, Tensor Real [5] is a one-dimensional tensor, where the size of the first dimension is 5, which contains real numbers.
Vehicle has a comprehensive support for programming with tensors, which we will see throughout this tutorial. The interested reader may go ahead and check the documentation pages for tensors: https://vehicle-lang.readthedocs.io/en/stable/language/tensors.html.
Networks
Given this, we can declare the network itself:
@network
acasXu : Input -> Output
Networks are declared by adding a @network annotation to a function declaration, as shown above.
Note that no implementation for the network is provided directly in the specification, and instead will
be provided later at compile time.
However, the name acasXu can still be used in the specification as any other declared function would be.
This follows the Vehicle philosophy that specifications should be independent of any particular network, and should be able to be used to train/test/verify a range of candidate networks implementations.
Values
New values can be declared in Vehicle using the following syntax, where the first line provides the declaration’s type and the bottom line provides its definition.
<name> : <type>
<name> = <expr>
For example, as we’ll be working with radians, it is useful to define a real number called pi.
pi : Real
pi = 3.141592
While in many cases, the types provide useful information to the reader, in general types can be omitted. For example, in this case it is cleaner to simply write the declaration as:
pi = 3.141592
The Vehicle compiler will then automatically infer the correct Real type.
Problem Space versus Input Space
Neural networks nearly always assume some amount of pre-processing of the input and post-processing of the output.
In our ACASXu example, the neural networks are trained to accept inputs in the range
When we encounter such problems, we will say we encountered an instance of problem space / input space mismatch, also known as the embedding gap.
If we were to reason on input vectors
directly, we would be writing specifications in terms of the input space (i.e. referring to the neural network inputs directly).
However, when reasoning about properties of neural networks, it is much more convenient to refer to the original problem.
In this case specifications will be written in terms of the problem space.
Being able to write specifications in the problem space (alongside the input space) is a feature that distinguishes Vehicle from
majority of the mainstream neural network verifiers, such as e.g. Marabou, ERAN, or
We start with introducing the full block of code that will normalise input vectors into the range
For clarity, we define a new type synonym for unnormalised inputs in the problem space.
type UnnormalisedInput = Input
Next we define the minimum and maximum values that each input can take. These correspond to the range of the inputs that the network is designed to work over. Note that these values are in the problem space.
minimumInputValues : UnnormalisedInput
minimumInputValues = [0, -pi, -pi, 0, 0]

maximumInputValues : UnnormalisedInput
maximumInputValues = [60261, pi, pi, 1200, 1200]
The above is the first instance of vector definition we encounter.
The type-checker will ensure that all vectors written in this way are of the correct size (in this case, 5).
Then we define the mean values that will be used to scale the inputs:
meanScalingValues : UnnormalisedInput
meanScalingValues = [19791.091, 0.0, 0.0, 650.0, 600.0]
An alternative method for defining new vectors is to use the foreach constructor, which is used to provide a value for each index i.
This method is useful if the vector has some regular structure.
For example, we can now define the normalisation function that takes an unnormalised input vector and
returns the normalised version.
normalise : UnnormalisedInput -> Input
normalise x = foreach i .
  (x ! i - meanScalingValues ! i)
    / (maximumInputValues ! i - minimumInputValues ! i)
Using this we can define a new function that first normalises the input vector and then applies the neural network:
normAcasXu : UnnormalisedInput -> Output
normAcasXu x = acasXu (normalise x)
Functions
In the above block, we saw function definitions for the first time, so let us highlight the important features of the Vehicle language concerning functions.
Function declarations may be used to define new functions. A declaration is of the form
<name> : <type>
<name> [<args>] = <expr>
Observe how all functions above fit within this declaration scheme.
Functions make up the backbone of the Vehicle language. The function type is written A -> B where A is the input type and B is the output type. For example, the function validInput above takes values of the (defined) type of UnnormalisedInput and returns values of type Bool. The function normalise has the same input type, but its output type is Input, which was defined as a tensor of real numbers with 5 elements.
As is standard in functional languages, the function arrow associates to the right so A -> B -> C is therefore equivalent to A -> (B -> C).
As in most functional languages, function application is written by juxtaposition of the function with its arguments. For example, given a function f of type Real -> Bool -> Real and arguments x of type Real and y of type Bool, the application of f to x and y is written f x y and this expression has type Real. This is unlike imperative languages such as Python, C or Java where you would write f(x,y).
Functions of suitable types can be composed. For example, given a function acasXu of type Input -> Output, a function normalise of type UnnormalisedInput -> Input and an argument x of type UnnormalisedInput the application of acasXu to the Input resulting from applying normalise x is written as acasXu (normalise x), and this expression has type Output.
Some functions are pre-defined in Vehicle. For example, the above block uses multiplication *, division / and vector lookup !. We have also seen the use of a pre-defined “less than or equal to” predicate <= in the definition of the function validInput (note its Bool type).
Quantifying over indices
In the normalise declaration we saw the foreach construct which constructs a vector given the definition of the element at each index i.
We can use the similar forall to quantify over all indices and return a Bool which is true
if the predicate holds for all indices and false otherwise.
For example, having defined the range of minimum and maximum values, we can define a simple predicate saying whether a given input vector is in the right range:
validInput : UnnormalisedInput -> Bool
validInput x = forall i .
  minimumInputValues ! i <= x ! i <= maximumInputValues ! i
Equally usefully, we can write a function that takes an output index i and an input x and returns true if output i has the minimal score, i.e., neural network outputs instruction i.
minimalScore : Index 5 -> UnnormalisedInput -> Bool
minimalScore i x = forall j .
  i != j => normAcasXu x ! i < normAcasXu x ! j
Here the Index 5 refers to the type of indices into Vectors of length 5, and implication => is used to denote logical implication.
Therefore this property says that for every other output index j apart from output index i we want the score of action i to be strictly smaller than the score of action j.
Naming indices
As ACASXu properties refer to certain elements of input and output tensors, let us give those tensors indices some suggestive names. This will help us to write a more readable code:
distanceToIntruder = 0   -- measured in metres
angleToIntruder    = 1   -- measured in radians
intruderHeading    = 2   -- measured in radians
speed              = 3   -- measured in metres/second
intruderSpeed      = 4   -- measured in meters/second
The fact that all tensors types come annotated with their dimensions means that it is impossible to mess up indexing into vectors, e.g. if you changed distanceToIntruder = 0 to distanceToIntruder = 5 the specification would fail to type-check as 5 is not a valid index into a Tensor with dimensions [5].
Similarly, we define meaningful names for the indices into output tensors.
clearOfConflict = 0
weakLeft        = 1
weakRight       = 2
strongLeft      = 3
strongRight     = 4
Property Definition in Vehicle
We now make up for the time invested into learning the Vehicle syntax, as stating a verification property becomes very easy. Let us now look at the property again:
If the intruder is directly ahead and is moving towards the ownship, the score for COC will not be minimal.
We first need to define what it means to be directly ahead and moving towards. The exact ACASXu definition can be written in Vehicle as:
directlyAhead : UnnormalisedInput -> Bool
directlyAhead x =
  1500  <= x ! distanceToIntruder <= 1800 and
  -0.06 <= x ! angleToIntruder    <= 0.06

movingTowards : UnnormalisedInput -> Bool
movingTowards x =
  x ! intruderHeading >= 3.10  and
  x ! speed           >= 980   and
  x ! intruderSpeed   >= 960
Note the reasoning in terms of the “problem space”, i.e. the use of unnormalised input vectors.
We have already encountered the vector lookup ! before; but now we have a new predefined comparison function, >=, “greater than or equal to”. The connective and is a usual Boolean connective (note the type of the function is Bool).
There is little left to do, and we finish our mini-formalisation with the property statement:
@property
property3 : Bool
property3 = forall x .
  validInput x and directlyAhead x and movingTowards x =>
  not (minimalScore clearOfConflict x)
To flag that this is the property we want to verify, we use the label @property, we have seen this notation before when we used @network to annotate the neural network declaration. The final new bit of syntax we have not yet discussed is the quantifier forall.
Infinite quantifiers
One of the main advantages of Vehicle is that it can be used to state and prove specifications that describe the network’s behaviour over an infinite set of values.
We have already seen the forall operator used in the declaration validInput – however, there it was quantifying over a finite number of indices.
The forall in the property above is a very different beast as it is quantifying over an “infinite” number of values of type Tensor Real [5]. The definition of property3 brings a new variable x of type Tensor Real [5] into scope. The variable x has no assigned value, but represents an arbitrary input of that type.
Vehicle also has a matching quantifer exists.
How to run Vehicle
To verify this property, we only need to have:
- a verifier installed (at the moment of writing Vehicle has integration with Marabou);
- the actual network or networks that we wish to verify. These need to be supplied in an ONNX format, one of the standard formats for representing trained neural networks.
Having these suitably installed or located, it only takes one command line to obtain the result (note the vcl file, where we have written the above specification):
 vehicle verify \
  --specification acasXu.vcl \
  --verifier Marabou \
  --network acasXu:acasXu_1_7.onnx \
  --property property3
Vehicle passes the network, as well as a translation of our specification, to Marabou, and we
obtain the result – property3 does not hold for the given neural network, acasXu_1_7.onnx:
Verifying properties:
  property3 [======================================================] 1/1 queries
    result: ✗ - counterexample found
      x: [1799.9886669999978, 5.6950779776e-2, 3.09999732192, 980.0, 960.0]
Furthermore, Vehicle gives us a counter-example in the problem space! In particular an assignment
for the quantified variable x that falsifies the assignment.
Exercises
We will use symbols (⭑), (⭑⭑) and (⭑⭑⭑) to rate exercise difficulty: easy, moderate and hard.
The exercises assume that you already installed Vehicle as described in vehicle documentation.
Exercise (⭑)
Start by simply running the code that was discussed in the above chapter.
It is available from the examples section of the tutorial repository
Repeat the steps described in this chapter: download the Vehicle specification and the network, and verify the ACAS Xu Property 3.
Did it work? If yes, you are ready to experiment with your own specifications.
Exercise (⭑⭑). Problem Space versus Input/Output Space
We discussed an instance of the embedding gap when verifying Property 3. In particular, we reasoned in terms of the problem space, but verified the network trained on the input space.
Property 1 in the Acas Xu library is an example where the problem space and the output space deviate, as well. This makes Property 1 specification somewhat harder.
For your first exercise, define Property 1 in Vehicle, paying attention to careful handling of the embedding gap.
ACAS Xu Propery 1: If the intruder is distant and is significantly slower than the ownship, the score of a COC advisory will always be below a certain fixed threshold.
Taking the original thresholds, this boils down to:
Note:
The ACAS Xu neural network outputs are scaled as follows: given an element
To run the verification queries, please use the networks available from the tutorial repository.
Exercise (⭑⭑). The full ACAS Xu challenge in one file
Why not trying to state all 10 ACAS Xu properties in one .vcl file?
Try running the verification query in Vehicle using all
Exercise (⭑⭑⭑). Your first independent Vehicle specification
- Clone the tutorial repository.
- Find the
iris_model.onnxmodel underexercises/chapter2/iris-dataset. This model was trained on the famous Iris flower data set. - Find the Iris data set files
iris_test_data.idxandiris_test_labels.idxunderexercises/chapter2/iris-dataset. - Examine the data set and try to define a few “obvious properties” that should hold for the model. You a free to look at the Wikipedia page for the Iris flower data set or consult other sources.
- Write those properties as a Vehicle specification. Ensure that your specification is well-typed. See the Vehicle Manual for how to type-check a Vehicle specification file.
- Verify that the properties in your Vehicle specification hold using the
vehiclecommand.